
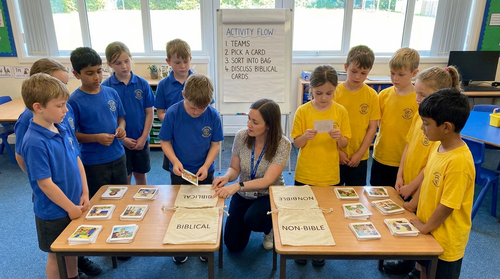
TRIGGER
Disciple Tag
Material
Steps
Material
- 1 medium size bag written BIBLICAL
- 1 medium size bag written NON-BIBLICAL
- Cards with biblical theme
- Cards with non-biblical theme
Steps
- Divide the children into 2 teams
- Mix the biblical and non-bible cards and divide the cards into piles. One pile for each team.
- Each child will pick a card, examine the cards runs and place it in the correct bag.
- When all the children have placed a card in the bags, the cards will be taken one by one from the biblical bag and then the class will discuss why it belongs in the bag.
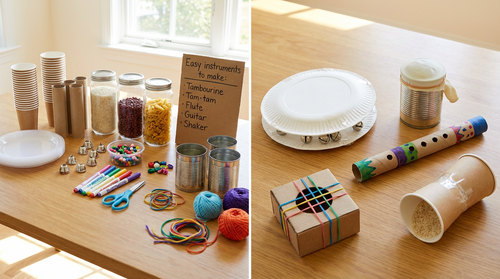
CRAFT
Rejoice, praise, glorify God
Material
Steps
1. Cup or Plate Tambourine
Materials:
Steps:
2. Tam‑tam (Drum)
Materials:
Steps:
3. Paper‑Towel Tube Flute (Sound Tube)
Materials:
Steps (simple version – wind tube):
4. Guitar from Tin Can or Box
Materials:
Steps (tin‑can guitar):
Steps (box guitar if no can):
5. Shaker (Maracas Style)
Materials:
Steps:
6. Bell Bracelet (for any instrument)
Materials:
Steps:
Material
- Cups
- Plates
- Paper Towel cardboard
- Dry rice
- Beans
- Dry pasta
- Bells
- Beads
- Markers
- Scissors
- Tin cans
- Elastics
- Yarn, strings to make bracelet with bells
Steps
- Cover the table, gather markers, scissors, tape/glue, and all your listed items.
- Remind kids not to put small pieces (rice, beans, beads, bells) in their mouths.
1. Cup or Plate Tambourine
Materials:
- 2 plastic/paper plates or 2 sturdy cups, dry rice/beans/pasta, beads, bells, tape or stapler, yarn/elastics, markers.
Steps:
- Let kids decorate the outside of the plates or cups with markers.
- Put a small handful of rice/beans/pasta and a few beads or bells inside one plate or cup (not too full so it can shake).
- For plates: place the second plate on top, edges touching, and tape or staple all around so nothing can fall out.
- For cups: put one cup on top of the other, rims touching, and tape securely around the seam.
- Tie a few bells onto short pieces of yarn or elastics and tape or knot them to the edge for extra jingle.
2. Tam‑tam (Drum)
Materials:
- Tin can (clean, no sharp edges; label removed), balloon or thick paper, elastics, markers, optional: wooden spoon or stick.
Steps:
- Make sure the can is clean and dry; tape any sharp edge if needed.
- Cut the neck off a balloon and stretch the balloon piece tightly over the open top of the can; secure with elastics around the rim.
- If you don’t have a balloon, tape a piece of thick paper over the top, pulling it tight.
- Decorate the sides of the can with markers.
- Tap the top with fingers or a wooden spoon to play your drum.
3. Paper‑Towel Tube Flute (Sound Tube)
Materials:
- Paper towel cardboard tube, scissors, markers, tape, optional: thin paper or wax paper, elastic.
Steps (simple version – wind tube):
- Let kids decorate the outside of the tube with markers.
- Use scissors to carefully poke 4–6 small “holes” along the front of the tube (just marks or tiny cuts if kids are young).
- To play, hold one end near the mouth and **hum or blow** into the tube while covering and uncovering the “holes” with fingers to change the sound.
- Cover one end of the tube with a small square of thin paper or wax paper, hold it tight, and secure it with an elastic.
- Have kids hum into the open end; the paper will buzz and make a fun “flute/kazoo” sound.
4. Guitar from Tin Can or Box
Materials:
- Empty tin can or small box, elastics, tape, markers.
Steps (tin‑can guitar):
- Decorate the sides of the can with markers.
- Stretch 3–5 elastics of different thicknesses around the can so they cross over the open side (like guitar strings).
- Slide the elastics so they are next to each other over the opening.
- Kids can pluck the elastics to hear different pitches.
Steps (box guitar if no can):
- Take a small box (like a tissue box) and decorate it.
- Stretch elastics around the box so they pass over the opening.
- Pluck the elastics to play.
5. Shaker (Maracas Style)
Materials:
- Plastic cups or small tin cans, dry rice/beans/pasta, beads, tape, markers, yarn, bells.
Steps:
- Decorate the outside of the cups or cans.
- Put a small amount of rice/beans/pasta and a few beads inside one cup or can.
- Close with a second cup or cover the top of the can with paper; tape securely all the way around.
- Tie bells onto short yarn pieces and tape or knot them to the outside for extra jingle.
- Shake to play.
6. Bell Bracelet (for any instrument)
Materials:
- Yarn or string, small bells, beads, scissors.
Steps:
- Cut a piece of yarn long enough to wrap loosely around a child’s wrist or ankle, leaving extra for tying.
- Thread beads and bells onto the yarn in a pattern (for example: bead–bell–bead–bell).
- Tie a knot on each side of every bell so they don’t slide too far.
- Tie the bracelet loosely around the wrist or ankle so it’s comfortable but secure.
- Kids can wear the bracelet while playing their tambourine, drum, flute, guitar, or shaker for extra rhythm.
GAME
Material
Steps
Explain to the children that we often jump for joy when we are happy or excited. That is why Elizabeth’s unborn baby jumped inside her at the good news of the approaching birth of Jesus. Elizabeth reminds us that there are many methods of glorifying God and that He delights in our praise. Even John the Baptist praised, before being born!
- Blindfold
Steps
- Have the children form a line across the room.
- Explain that the children are going to to have a jumping contest.
- They must listen to you and do what you tell them to do. Give commands such as:
- Jump three small jumps forward.
- Jump two small jumps back.
- Jump one small jump left.
- Jump one jump high in the air.
Explain to the children that we often jump for joy when we are happy or excited. That is why Elizabeth’s unborn baby jumped inside her at the good news of the approaching birth of Jesus. Elizabeth reminds us that there are many methods of glorifying God and that He delights in our praise. Even John the Baptist praised, before being born!

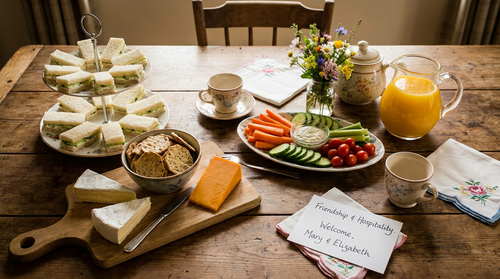
CREATIVE SNACK
Tea party Snacks that represents friendship and hospitality
Material
Steps
Material
- Juice
- Crackers
- Cheese
- Vegetables
Steps
- Place the items on a table for create a Tea Party.
- Since Mary visited Elizabeth for several months, serve small tea sandwiches, crackers with cheese, or light snacks that represent friendship and hospitality.
OBJECT LESSON
Material
Steps
Lesson
The "balloon in a bottle" is a classic science experiment that demonstrates the principles of air pressure and volume. When a balloon is placed inside a bottle and its neck is stretched over the opening, it becomes impossible to inflate because the air already inside the bottle has nowhere to escape.
Elizabeth wasn’t able to have a baby. But the angel told Mary that Elizabeth was going to have a child in her old age.
- Balloon
- Bottle
Steps
- Place the balloon inside a bottle, stretching the opening of the balloon over the mouth of the bottle.
- Try to blow up the balloon. It will not inflate because the air trapped inside the bottle is compressed but cannot escape.
- Punch a small hole (2-5 mm) in the side or bottom of the bottle.
- While the balloon is inflated, cover the hole with a finger.
- The balloon will remain inflated even if you stop blowing.
Lesson
The "balloon in a bottle" is a classic science experiment that demonstrates the principles of air pressure and volume. When a balloon is placed inside a bottle and its neck is stretched over the opening, it becomes impossible to inflate because the air already inside the bottle has nowhere to escape.
Elizabeth wasn’t able to have a baby. But the angel told Mary that Elizabeth was going to have a child in her old age.
